Monday, December 31, 2012

Macarons meringues filled with chestnut spread (meringues macarons à la crème de marrons)...

Some days, in cooking life, are better than others...
Some days, you succeed all you begin.
Every ingredients between your hand become gold. 
Every perfume combine perfectly.
Some days, the Cooking God is in your kitchen, with you ! 

This day was not today for me ...

I don't know where was the Cooking God, today, but I can certify, he wasn't in MY kitchen ! 

Riddle : What is this ?


It was supposed to be tiny meringues christmas trees ... 
It was supposed to be like THIS : 


www.lapopottedemanue.com

Finally, pitiful flat disc !

But as I didn't want to throw away my meringues disc, I've tried to find a solution and I remembered an old recipe I never dared to cook. 


It was now or never ! 

Cooking God was not with me but there were one or two angels, because, I had whole cream in my fridge and chestnut spread in my kitchen cupboard ! 
YES ! 
I could try my recipe ! 

This must be baked the day before you want to eat them. 

Here what you'll need, for 30 ruined tiny Christmas tree or 30 wonderful flat disc :
  • 2 eggs whites 
  • 50 grammes of sugar
  • 50 grammes of icing sugar
  • One pinch of salt
  • One vanilla pod (or one tablespoon of vanilla extract)
  • Some decorations
  • And... something very important in theory ... a piping bag.

For the garniture, you'll need : 
  • 200 grammes of chestnut spread
  • 30 cl of heavy cream extra cold
  • One tablespoon of icing sugar.

Your oven must be preheated at 90°C (190°F / Th 3).

Step 1 : 
Open your vanilla pod and add the seeks to the two sugars. 
If you use vanilla extract, don't add it at this step. I'll tell you ... Trust me ...


Step 2 : 
With a pinch of salt, whip up your eggs whites, until they are very solid, tough. 
When it's done, add your two sugars mixed, tablespoon by tablespoon. 
Then, you can pour your vanilla extract. 


Step 3 :
... Fill your piping bag with the beaten eggs whites. 


Step 4 : 
At this step, I was still very confident, sure of myself ! My Xmas trees would be marvelous. I was imagining my mother telling me, with ecstasy : "Did you really bake this ? Dear, this is wonderful !".
And with modesty, I would have answer how much it was easy to make ... 
Never be too sure of yourself ! Cooking God will punish you ! 
Well ... So, try to make some Xmas tree. 


At this point, I realized my dreams failed. 


With courage but no more faith, I used decorations. 
Believe me, at this point, no one could enter in the kitchen. I was a bear. Ready to eat everyone who could have a word : "What the Hell is this ???".
But my little family knows me and they don't ask... Until I find a solution. 
Oh yes, sorry, I forgot ... 
My daughter dared to tell me : "It looks like snowmen's pooh"...
And she ran. Fast. VERY FAST. 
And far ... VERY FAR ! RUN, Forrest, RUN !!

WELL ...
In the oven for 1 hour and 15 minutes. Then, stop the oven and let the meringues in for the night. 

Step 5 : 
The day after, whisk your heavy cream EXTRA COLD (very important point to succeed a Chantilly) and add one tablespoon of icing sugar.
Remember, it can take 10 minutes or so to see it becoming a real Chantilly. 


Step 6 : 
Pour the chestnut spread and stir slowly to incorporate he mixture.


That's it ! 


Step 7 : 
Fill your wonderful (yes, because they are !) little meringues as macarons. 
Finally, let them in the fridge for one hour.


Believe me, my guests just loved it ! 
Bon appétit ! 


I wish you to spend a good end of year ! 


Recapituative for 30 ruined tiny Christmas tree or 30 wonderful flat disc :

  • 2 eggs whites 
  • 50 grammes of sugar
  • 50 grammes of icing sugar
  • One pinch of salt
  • One vanilla pod (or one tablespoon of vanilla extract)
  • Some decorations
  • And a piping bag.

For the garniture, you'll need : 
  • 200 grammes of chestnut spread
  • 30 cl of heavy cream extra cold
  • One tablespoon of icing sugar.

Your oven must be preheated at 90°C (190°F / Th 3).

Open your vanilla pod and add the seeks to the two sugar. If you use vanilla extract, don't add it at this step. 

With a pinch of salt, whip up your eggs whites, until they are very solid, tough. 
When it's done, add your two sugars mixed, tablespoon by tablespoon. 
Then, you can pour your vanilla extract. 

Fill your piping bag with the beaten eggs whites. 

Make some little discs and decorate them. 

In the oven for 1 hour and 15 minutes. Then, stop the oven and let the meringues in for the night. 


The day after, whisk your heavy cream EXTRA COLD and add one tablespoon of icing sugar.
Remember, it can take 10 minutes or so to see it becoming a real Chantilly. 

Pour the chestnut spread and stir slowly to incorporate he mixture.

Fill your little meringues as macarons. 
Finally, let them in the fridge for one hour.


Wednesday, December 26, 2012

Easy yole lug (Bûche de noël facile)

Here the cake I bake for almost every Christmas. 
I know ... I'm in late ... It's not Christmas anymore...
But  I did not know it would have been so hard to bake and post almost in the same time ! 
I'm learning.

Finally, Xmas is over. Don't get me wrong, I just love this period. But I always have the feeling to eat without stopping, for days !

Years ago, my parents lived in Clermont-Ferrand (center of France) and it was difficult for all the family (because we had to spend time with our family-in-law too) to be all together exactly for Christmas day.
So we took the habit to celebrate Xmas when we were together. That's all.

This year, my second sister had to spend some time with her husband's family who don't live in the same town and my youngest sister, being a policewoman, couldn't have holidays for Christmas's day.
So we celebrated Christmas on december 23th.

That's the reason why we began the festivities early ! 
My stomach just want to eat zucchini, now ! No more foie gras, or turkey or anything else with too much fat contents !

But I have to end with my Yole Lug. Maybe not the best in the world. But we like it, so ... :

Here what you'll need : 
For the cake : 
  • 4 eggs
  • 120 grammes of sugar
  • 140 grammes of flour
  • 1 pinch of salt
For the fixings and topping : 
  • 250 grammes of dark chocolate
  • 75 grammes of unsalted butter.

Your oven must be preheated at 180°C (350°F / Th6).

Step 1 : 
Separated yolk from white and whisk the yolk with sugar until it become yellow clear. 


Step 2 : 
Add a tablespoon of vanilla extract. Yes I know, I forget to say it before ... Chicken brain, I told you ! 


Step 3 : 
Whip up the eggs white with a little pinch of salt. 


Step 4 : 
Mix the flour and add gently the white to the mixture. Remember, to ease this step, pour one first large spoon of white and whisk it with energy. 
When it's done, your mixture will be easier to work. 
After this, you can stir gently the rest of the white. 


Step 5 : 
Spread the mixture on a hotplate covered by a greaseproof paper, giving it a regular rectangle form. 


In the oven for 12 minutes. 

Step 6 : 
Moisten a clean tea towel and turn out the cake on it. 


Step 7 :
Immediately, but softly, take off the greaseproof paper ! 


And immediately but taking care because, believe me ... IT BURNS ... roll the cake.


Let it cool this way. 

Step 8 : 
With a sharpened knife, cut the two extremities. 


Step 9 : 
Let melt the chocolate and the butter, 30 seconds by 30 seconds in the microwave...

and, unrolling the cold cake, spread the mixture generously in it. 
You can add coconut powder, for example, if you like. Or almonds. Or some strawberry / orange jam if you like the mix between those products.


Step 10 : 
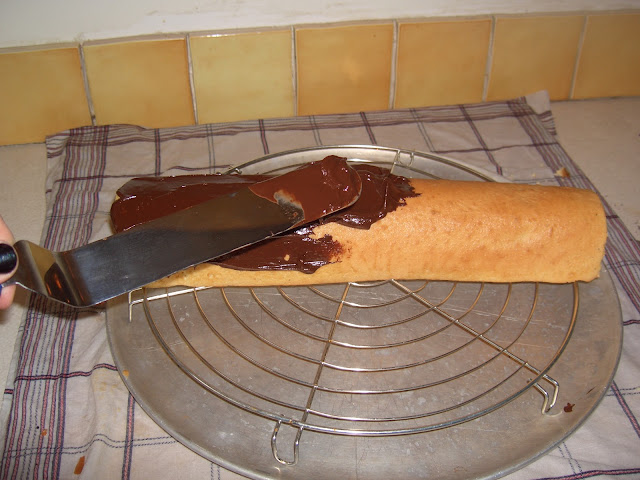
Roll it again and with the rest of the chocolate, cover all the cake (even the extremities) with a spatula. Using a spatula will give the design of a a real log.
If not, take a fork and make some design all along the cake. 


Step 11 : 
Let it cold out of the fridge (ambient temperature) and decorate it as you want. 
That's ready ! 


Bon appétit ! 


Recapitulative : 
For the cake : 
  • 4 eggs
  • 120 grammes of sugar
  • 140 grammes of flour
  • 1 pinch of salt
For the fixings and topping : 
  • 250 grammes of dark chocolate
  • 75 grammes of unsalted butter.

Your oven must be preheated at 180°C (350°F / Th6).

Separated yolk from white and whisk the yolk with sugar until it become yellow clear. 

Add a tablespoon of vanilla extract. 

Whip up the eggs white with a little pinch of salt. 

Mix the flour and add gently the white to the mixture. 

Spread the mixture on a hotplate covered by a greaseproof paper, giving it a regular rectangle form. 

In the oven for 12 minutes. 

Moisten a clean tea towel and turn out the cake on it. 

Immediately, but softly, take off the greaseproof paper ! 

And immediately but taking care because, believe me ... IT BURNS ... roll the cake.
Let it cool this way. 

With a sharpened knife, cut the two extremities. 

Let melt the chocolate and the butter, 30 seconds by 30 seconds in the microwave and, unrolling the cold cake, spread the mixture generously in it. 

Roll it again and with the rest of the chocolate, cover all the cake (even the extremities) with a spatula. 

Let it cold out of the fridge (ambient temperature) and decorate it as you want. 

Tuesday, December 25, 2012

Joyeux Noël ...

...to you and all people you love.


Friendly.

Joyeux Noël à vous et à tous ceux que vous aimez.
Amicalement.

Monday, December 24, 2012

Marrons glacés - Last day.

Finally ...
Here's the last step for your marrons glacés.
They dried for 24 hours. 
You just need to end them, with the famous sugared topping. 

Your oven must be preheated at 180°C (350°F / Th 6).

Step 1 : 
Take 150 grammes of icing sugar and 12 tablespoons of your chestnuts syrup. 
Whisk it to prevent lumps. 


Step 2 :
Pour this mixture gently on your chestnuts, with a brush or a teaspoon.


Step 3 : 
In the oven for 3 minutes, no more ! 
And here your marrons glacés ended ! 


Let them dry for 4 hours and offer them ! 
You'll see how much they are better than the one you buy in shop. 
You feel the chestnut and not only the sugar.
In my family, they are really loved.


Most of all, I keep the syrup who is just divine on an vanilla ice cream or in a nature yogurt, for example.
I keep some jars and I offer it too.


I wish un JOYEUX NOËL  to you and all the people you love.


Saturday, December 22, 2012

Marrons glacés - Day 6.

They are ready. They are conserved and you already can eat them. 
But, now, they must dry. 

Here the almost final step.

Step 1 : 
Strain the chestnuts and arrange the on a cooking grille, who will go in the oven the next day, for 3 minutes.


Step 2 :
With a tablespoon, top them with the syrup. Keep some syrup for tomorrow ! 


Let them dry in ambient temperature for 24 hours.

I've got some problems with Blogger today, I just hope to be able to post tomorrow. 

I'm trying to post all the recipes I'm doing for Christmas, but there's something else I did not think : It's very complicated to cook and post almost immediately after. 

On monday morning, I'm going to bake La Bûche de Noël (Yule log). I hope Blogger won't let me down !! :)

I hope everything is fine for you and you're preparing your Xmas period with joy. 
See you tomorrow ! 

Thursday, December 20, 2012

Caramelized pineapple (ananas caramélisé)

This. Is. So. Good ...........

The last week end, we had friends and we cooked a traditional Fondue Savoyarde. Do you know that ? Melted cheese ?


This is divine. Ok... A little bit heavy. But I could eat one almost each week during winter ! 
With a white wine of Savoie ... I'M HUNGRY !!
Well, of course, you need a light dessert to go with. Don't even think to eat a chocolate cake, for example. 


This is period for fresh pineapple. And in my home, pineapple, we love that. 

So I wanted to use one for my dessert.

I found this recipe on internet and it was excellent ! 

I think it can be a good and light idea of dessert to end our Christmas diners.


Here what you'll need for 6 persons : 

  • One pineapple
  • 1 vanilla pod
  • 200 grammes of brown sugar
  • 20 cl of water.
Your oven must be preheated at 180°C (350°F / Th 6)


Step 1 : 
Peel your pineapple. 
Never listen people who tell you it's difficult or hard. Much easier than peeling an orange (Step 1).
Just cut the bottom and the top and just turn around.

Step 2 :
When it's done, cut your pineapple in 4 large pieces and take off the heart, who is always a little bit hard. 


Step 3 :
Cut them in smallest pieces and put them in little or big dish who can go in the oven.


Step 4 :
In a pan, pour water and sugar  and let it boil.


Step 5 : 
Add the vanilla pod, opened. 
Let thicken the caramel. It can last 15 minutes or so. Just stay close to it, to not let it burn. It must be thick but not too much. Just enough to be poured on the pineapples when it's ready. 


In the oven for 15 minutes.
Better eat them tepid. With vanilla ice cream, for example. 
I made them cook 10 minutes before and recooked them during 5 minutes just before serving.
It's delicious. Sweet and caramelised. Excellent !


Bon appétit, les amis ! 


Just to remember ... sigh ... 

fonduesavoyarde.com

Recapitulative : 
  • One pineapple
  • 1 vanilla pod
  • 200 grammes of brown sugar
  • 20 cl of water.
Your oven must be preheated at 180°C (350°F / Th 6)

Peel your pineapple. 
Just cut the bottom and the top and just turn around.

When it's done, cut your pineapple in 4 large pieces and take off the heart, who is always a little bit hard. 

Cut them in smallest pieces and put them in little or big dish who can go in the oven.

In a pan, pour water and sugar and let it boil.

Add the vanilla pod, opened. 
Let thicken the caramel. It can last 15 minutes or so.

In the oven for 15 minutes.

Better eat them tepid. With vanilla ice cream, for example. 
I made them cook 10 minutes before and recooked them during 5 minutes just before serving.